


8.2 Wall and ceiling finishes
SITEWORK STANDARDS
| 8.2 - S1 | Sitework standards |
| 8.2 - S2 | Plastering |
| 8.2 - S3 | Plasterboard and dry lining |
| 8.2 - S4 | Ceramic wall tiling |
(a) meet the Technical Requirements
(b) take account of the design
(c) follow established good practice and workmanship
Sitework that complies with the design and the guidance below will be acceptable for wall and ceiling finishes.
PLASTERING
Items to be taken into account include:
(a) background
EVENNESS
Background to be plastered should be sufficiently even to provide a reasonably plane plaster finish and to avoid the necessity for excessive dubbing out before the finish is applied.
BOND
The background should provide a satisfactory key. Backgrounds may be improved by:
- raking out masonry joints
- hacking and scratching
- applying a spatterdash coat or stipple coat
- applying a bonding agent.
SUCTION
Suction of the background should be checked for adequacy and should be reasonably even. Where different materials in the background could cause cracks, eg in floors of precast beams and infill blocks, metal lathing should be used or other precautions taken.
EDGE PROTECTION
Metal beads should be fixed to provide edge protection, where necessary, using zinc-plated fasteners as recommended by the manufacturer.
(b) services
All services to be concealed behind plaster should be completed and protected against any adverse effects of chemical action or thermal movement. Where there appears to be a risk of insufficient plaster cover to avoid surface cracking, fix metal lathing or wire netting.
(c) plaster mix
Plaster should be mixed in the specified proportions or as recommended by the plaster manufacturer for the particular location and use.
Undercoats and finishing coats should be compatible. Portland cement and gypsum plaster should not be used in the same mix.
(d) plaster thickness
DECORATIVE FINISH
Plaster should be applied to a thickness, excluding any dubbing out, sufficient to achieve the required quality of finish, in accordance with the following:
| Surface to be plastered |
Min no of coats |
Thickness of plaster |
| Walls | ||
| Metal lathing | 3 | 13mm (nominal from lathing) |
| Brickwork | 2 | up to 13mm |
| Blockwork | 2 | up to 13mm |
| Plasterboard or concrete |
1 | sufficient to provide a crack-free surface |
| Ceilings | ||
| Concrete | 2 | 10mm (maximum) |
| Plasterboard | 1 | skimcoat |
(e) application
SCHEDULING OF WORK
Plastering should not be carried out in weather which could adversely affect the finished result. Any plaster damaged by frost should be removed and replaced (reference should be made to Chapter 1.4 'Cold weather working').
MIXING
Materials should be mixed thoroughly, but prolonged mixing should be avoided. Avoid mixing more plaster than can be applied before it starts to set. Plaster should not be re-tempered.
PROTECTION
The completed work of other trades, especially timber, chipboard and glazing, should be protected from damp and damage during plastering.
PREPARATION
Before plastering is started, all surfaces should be dry, clean, and free from laitance, grease, loose material or any substance likely to prove harmful to the bond or the intended finished appearance of the plaster.
Joints between boarded or slab surfaces should be scrimmed, paper taped or otherwise treated as recommended by the manufacturer.
Dubbing out should be done well in advance of the application of the first coat.
PLASTERING
The background surface should be fully set for each coat of plaster. The surface should not be overworked and adequate time should be left between coats to allow strength and suction to develop.
(f) quality of finish
All plastered surfaces should be reasonably plane and true and with a quality of finish appropriate for the location and intended use.
Reveals, soffits to openings, external angles and the like, should be reasonably plumb and level, and ceiling lines and corners should be regular.
Particular care should be taken in areas around wall light points, wall light switches and socket outlets.
(g) plastic compound finish
Plastic compound finishes should be applied by suitably trained operatives.
PLASTERBOARD AND DRY LINING
Items to be taken into account include:
(a) background
EVENNESS AND STRENGTH
Plasterboard thickness should be correct for the support spacing.
Maximum limits are as follows:
| Board thickness (mm) |
Timber support centres (mm) |
Intermediate noggings required |
Perimeter noggings required |
| 9.5 | 400 | No | Yes |
| 450 | Yes | Yes | |
| 12.5 | 400 | No | Yes |
| 450 |
No | Yes | |
| 600 | Yes | Yes | |
| 15 | 600 | No | No |
Notes
- Cut edges should only be used at perimeters. In all other situations cut edges should finish over a support or nogging.
- Additional intermediate noggings may be required where fire resistance is necessary.
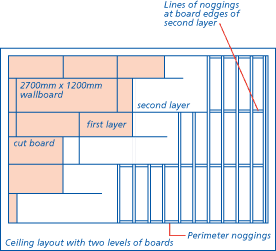
When double layers of plasterboard for ceilings are specified, the joints of one layer should not coincide with those of the other. The first layer should be fully fixed and have all cut edges supported. The second layer should be supported on all edges with noggings provided to suit.
SERVICES
There should be adequate support for:
- light points
- socket outlets
- other service installations.
Openings in plasterboard for services and electrical outlets should be accurately cut and any gaps in vapour control layers taped and sealed, as detailed in Chapter 6.2 'External timber framed walls'.
WATER VAPOUR RESISTANCE
Install vapour control layers where specified. Edges should be lapped over supports and be taped or sealed.
(b) surface finish
Plasterboard should be fixed face side out for both plastering and direct decoration finishes.
Tapered edge boards should be used for surfaces to be decorated directly on the board surface.
(c) scheduling of work
Plasterboard work should:
- not be started until the building is substantially weatherproof
- be programmed so that finishes are applied as soon as possible after completion.
(d) fixing
Fixing methods should be as follows:
- nails : hot dip galvanised, zinc electroplated or sheradised steel
- screws : zinc electroplated or black phosphate
(or to the board manufacturer's recommendations).
Fixings should be as follows:
| Board thickness (mm) |
Nail length (mm) |
Screw length (mm) into timber |
Screw length (mm) into steel |
| 9.5 | 30 | 32 | 22 |
| 12.5 | 40 | 36 | 22 |
| 15 | 40 | 36 | 25 |
Nails or screws should be not less than:
- 10mm from paper bound edges
- 13mm from cut ends of boards
- 6mm from edges of timber members.
Nail and screw heads should not project above the board surface.
Fixing centres should be as follows:
|
|
nailing to: | walls and ceilings - approximately 150mm centres (8 per linear metre) |
|
|
screwing to: | walls - approximately 300mm centres (8 per 2 linear metres) ceilings - approximately 230mm centres (5 per linear metre). |
DRY LINING ON ADHESIVE DABS
Boards should be fixed to a pattern of adhesive dabs, at approximately 300mm centres vertically, and as shown in the following table:
| Thickness of wall board [mm] |
Width of wall board [mm] |
Dabs per board [rows] |
| 9.5 | 900 | 3 |
| 9.5 | 1200 | 4 |
| 12.5 | 1200 | 3 |
Dabs should be applied to one board at a time.
MECHANICAL FIXINGS FOR THERMAL WALLBOARDS
At least 2 nailable plugs should be used per board in accordance with the manufacturer's recommendations.
PROPRIETARY SYSTEMS
Proprietary dry lining systems should be fixed in accordance with the manufacturer's recommendations.
(e) jointing
Where surfaces are to receive skim coat plaster, joints should be scrimmed or paper taped in accordance with the manufacturer's recommendations. Ceiling boards should be staggered to minimise any risk of cracking.
For unskimmed surfaces, joints should be filled, taped or finished as recommended by the manufacturer.
(f) gap sealing
A continuous ribbon of adhesive should be applied to the perimeter of external walls, openings and services in drylined walls to prevent air infiltration.
In addition:
- dry linings should be completely taped and filled at board joints and at abutments to ceilings and internal walls
- dry wall lining at door and window openings should be securely fixed and filled. This also applies at external and internal corners
- gaps around service points, electric sockets, light switches, etc should be filled with jointing compound.
(g) appearance
Unless designed otherwise, intersections should be formed at right angles and be flush. Junctions at floors and ceilings should be neat and regular.
Dry lining to be finished fair should be of a quality recommended by the manufacturer. Damaged boards should not be used.
CERAMIC WALL TILING
Items to be taken into account include:
(a) background
EVENNESS
The background to be tiled should be reasonably true so that a plane tile surface can be achieved. Under a 2m straight- edge, gaps should not be greater than:
- 3mm - for thin bed adhesives
- 6mm - for thick bed adhesives.
STRENGTH
The surface should be strong enough to accept the specified adhesive and support the tiling. Separate coats should be well bonded.
BOND
The background should provide a satisfactory key. Backgrounds may be improved by:
- raking out masonry joints
- hacking and scratching
- applying a bonding agent.
UNIFORMITY
Metal lathing or wire netting should be fixed across junctions where differential movement might occur.
SUCTION
Suction of the background should be adequate and reasonably consistent. Where different materials could cause cracks, eg across junctions, appropriate precautions should be taken, eg by fixing metal lathing.
WETTING
Where repeated or persistent wetting may occur, gypsum plasters should not be used. Plasterboard should be moisture resistant grade.
HEATING
Gypsum plasters should not be used where repeated or persistent heating occurs, eg on flues or near heat sources.
(b) adhesives
Tiles should be fixed as specified, using cement mortar or proprietary adhesive in accordance with manufacturers' instructions. Adhesives for tiles subject to frequent wetting should be water resistant.
(c) application
PREPARATION
Before tiling is started, surfaces should be dry, clean, and free from laitance, grease, loose material or any substance likely to prove harmful to the bond or the intended finished appearance of the tiling.
FIXING
In wet areas, tiles should be solidly bedded in adhesive.
Tiles should be fixed in straight and even courses to form a plane surface. Work generally should be of a straight and regular appearance. Take particular care where lighting points are close to the tiled surface, such as above washbasins in bathrooms.
JOINTING
Joints should be even and cutting neatly carried out. Make sure that the spacing is sufficient to allow expansion.
GROUTING
Grouting should be the specified mix and colour. The specified sealing method should be used at junctions between tiling and sanitary fittings.
Proprietary water resisting grouting should be used in accordance with manufacturers' recommendations.
EDGING
There should be no cut or unfinished tiles at exposed edges or external corners.
(d) movement
Properly designed movement joints should be
- built into tiling at centres not exceeding 4.5m both vertically and horizontally
- at all vertical corners in large tiled areas
- located at junctions with other surfaces or backgrounds.
Tiles without spacer lugs should have a minimum joint width of 1-2mm to relieve local stress.

